

.png)

Introduction
We all have heard about AI agents and how they can automate different kinds of workflows autonomously, But how do you monitor the performance of an LLM Agent 🤔? As we know, whenever we train a new LLM model or fine-tune a model we always have to evaluate the performance of the LLM based on the dataset to test the accuracy and other metrics of the LLM.
Similarly, AI agents can be random sometimes because they use LLMs under the hood so to make them production ready it is necessary to evaluate the agent performance to examine your agent to evaluate different aspects like,
- whether the agent is making the expected tool calls or not.
- whether the agent response is relevant to the user query or it is hallucinating.
- whether the LLM we are using for our agent is performing well or not.
There can be more than these aspects to evaluate your agent because it completely depends on your agent and the workflow you are trying to automate. In this blog we will try to evaluate our agent based on the given 3 aspects and see how our agent performs.
LangChain vs LangSmith
Now some of you might get confused between Langchain and LangSmith so let me make it clear for you. Langchain is a framework to create LLM chains, AI Agents and do other cool stuff with large language models. But on the other side, LangSmith is created to evaluate the things you created using Langchain to monitor and test their performance and results.
In this blog, we are going to create an AI agent using Langchain and then we will evaluate it using LangSmith. I am assuming that you have basic knowledge about AI agents and you can make a basic agent using Langchain or any other AI agent framework because here i won’t be going too much into agent creation but i will discuss the evaluation of agent which is the next step after creating an agent. If you want to know how to create AI agents then take a look at my other blogs where i have created several AI agents like AI SDR agent, AI code review agent and more from scratch.
What is LangSmith?
Now the first question that might come in your mind is that how do we evaluate our agent 🤔? There are several frameworks to evaluate your agent like LangSmith, Phoenix and Mosaic AI but in this blog we are going to use LangSmith which is LLM evaluation framework created by Langchain team. You can trace agent activity, create datasets, run experiments or evaluations using those datasets, make annotation and more using LangSmith and the best part is that it is completely free for single developer account 🤑!
In this blog, we are going to create one simple research agent using Langchain and then we will evaluate the agent response, tool calling functionality and different LLM performance for this agent so let’s get started 🚀!
Let’s create our agent
Now before going too much into LangSmith let’s create our simple research agent using Langchain. This agent will be able to fetch information from the internet and do some basic maths calculations (because i like math). We will also use one more tool to summarize our search results to get the final response in specific format.
So basically we will have 3 main tools:
- Calculator Tool (For basic math calculations)
- Google Search Tool (To search something on google)
- Summarization Tool (To summarize any text)
Prerequisites
Before building this agent, make sure you have:
- OpenAI API Key
- Serper API Key (For google search agent)
- Groq API Key (To access other models)
- LangSmith API Key (For agent evaluation)
Workflow
Let’s take a look at the agent workflow to understand it better
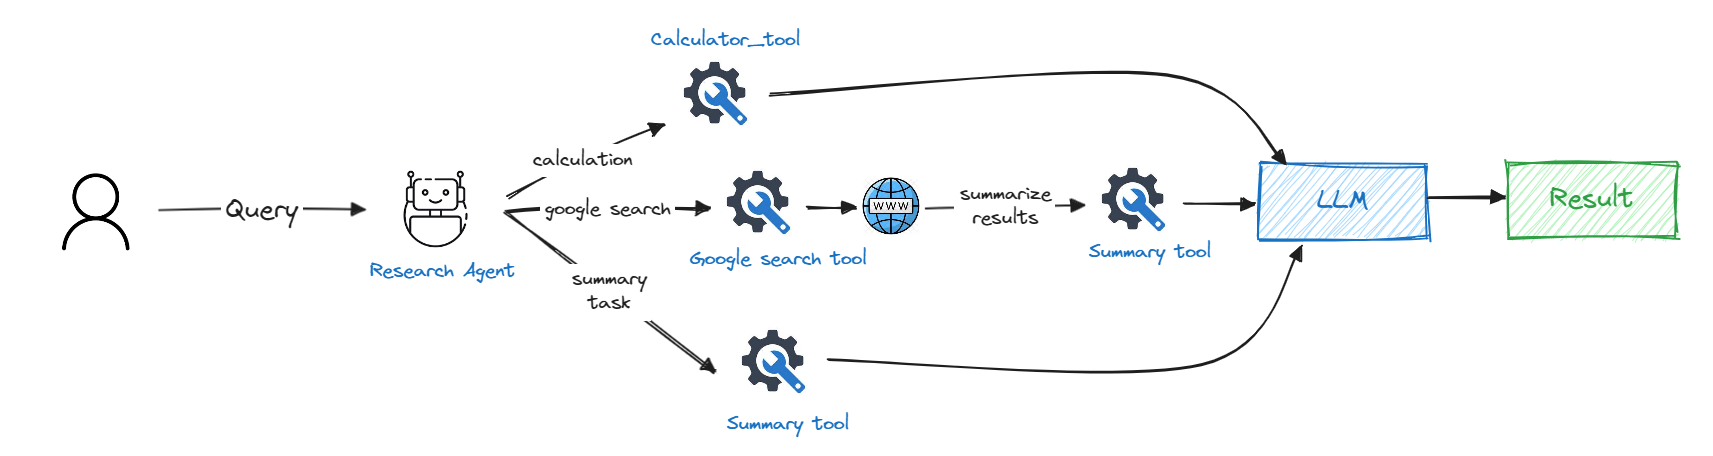
As we can see, the agent will have access to 3 tools and it can decide which tool to use based on the user query. If the user wants to know something that requires internet access then it will use the google search tool and then pass the search results to summary tool to summarize the results and respond back to the user. If the user wants to do some basic math calculations then it will use the calculator tool (it can just do addition, subtraction, multiplication and division 💀).
Now we know the full workflow of our agent so let’s start coding 👨💻!
Creating Tools
First, let’s install all the required dependencies. Don’t worry I will discuss every dependency when we will use it.
we will be using langchain, openai, tiktoken, langchain_community and langchain_openai to create our agent so lets import the required modules.
Now let’s get all of our api keys and store them in global variables
Now let’s initialize our LLMs, we will be using “gpt-4” as our LLM for now but in evaluation section we will try different models.
Now let’s create our first tool function for calculator tool. It will take 3 parameters: first number, second number and the operation to perform. so let’s make it
Now let’s create our second tool which will do google search using serper API and returns the search results as a string. It will take user query as a parameter.
Now let’s create our final tool which is summarization tool. It will take search results and user query as a parameter to summarize the results. We will use gpt-4 here to summarize our results but you are free to use any other model.
Creating Agent
Now it’s time to create and run our agent!
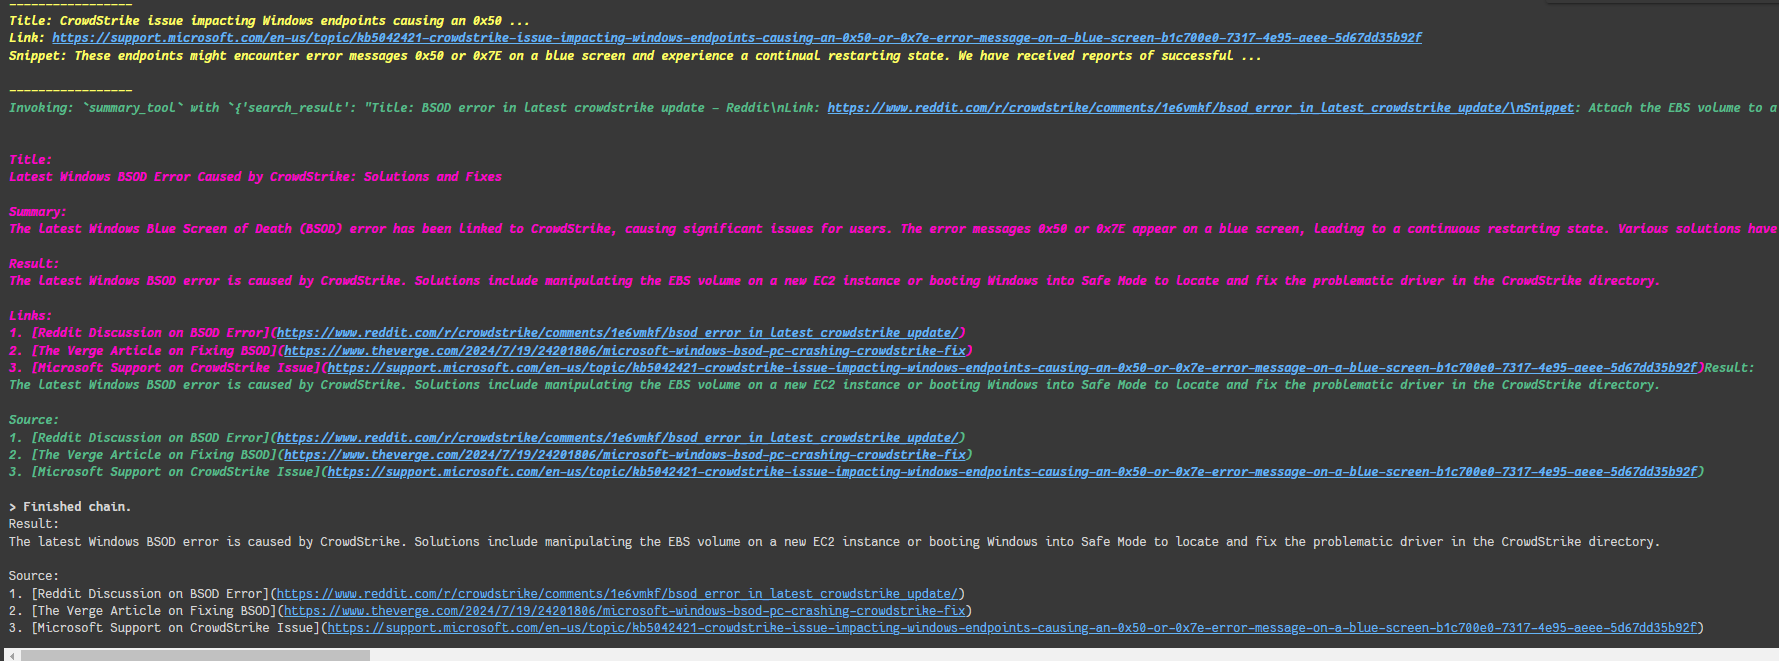
And it’s time to invoke our agent, Let’s try it by asking about the latest windows BSOD error because of crowdstrike.
As we can see, we are getting results related to the latest news!
LangSmith Overview
Now it’s time to add LangSmith in this agent, so first we will import required dependencies and add some minor code to trace our agent activities, but before that we need to create a project in LangSmith dashboard so let’s go there first🏃.
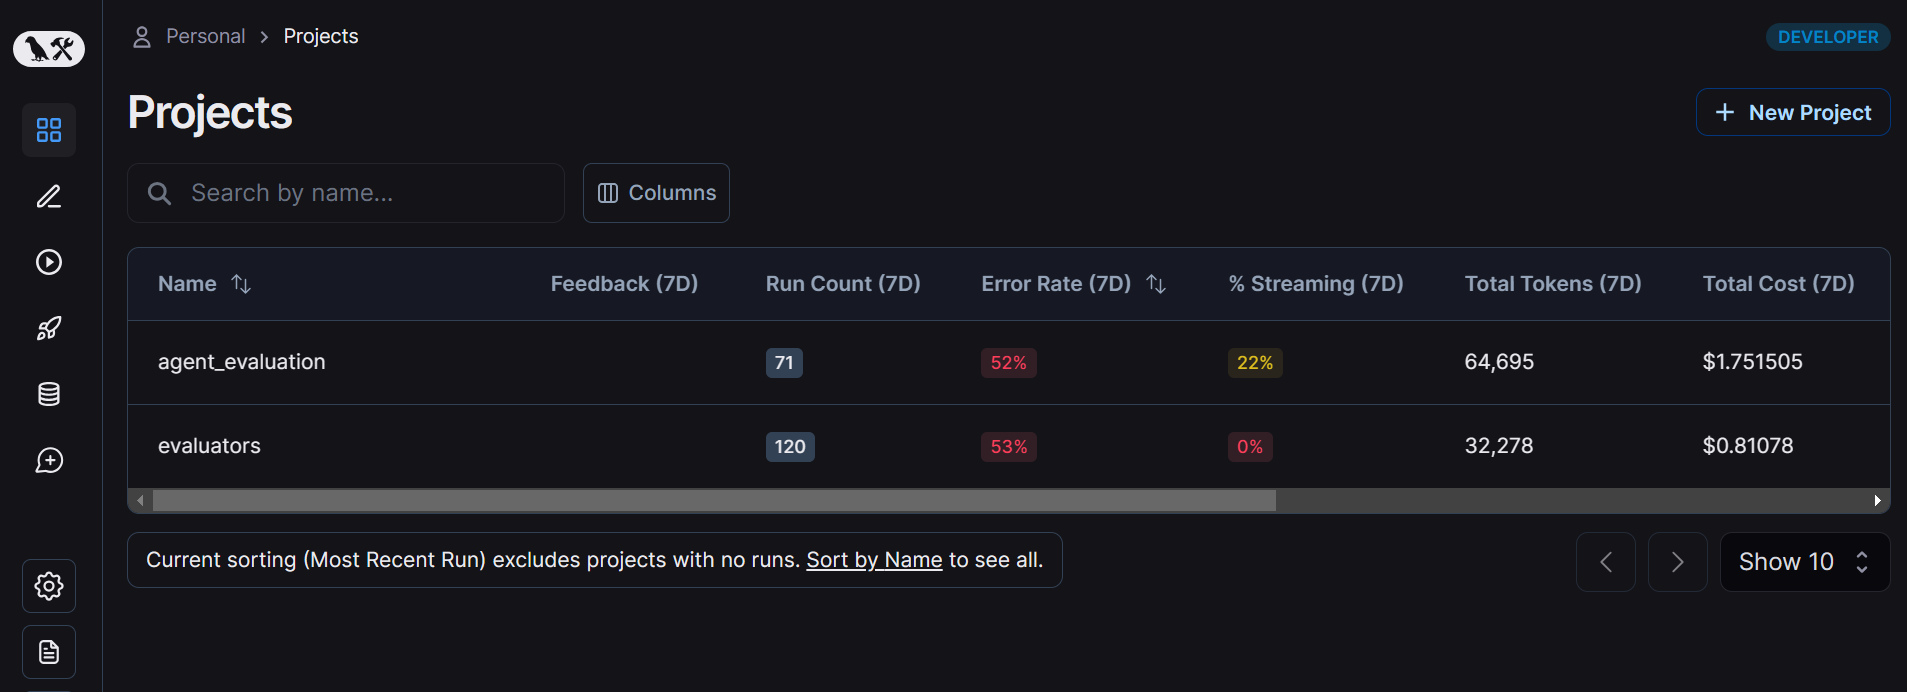
Your LangSmith dashboard should like this (you might not have any project if you are using it for first time)
On the dashboard, click on “New Project” button to create a new project and give it a name and now we are ready to integrate LangSmith in our project.
Tracing Agent Activity
Now first we will trace the agent activity using LangSmith so for that we will need to add some minor code in our existing agent code.
First import the required dependencies
Now add some environment variables to integrate your LangSmith project with the current agent
First we need to wrap our openai LLM so that LangSmith can trace every LLM activity.
Secondly, add “@traceable” decorator to every tool function to trace the function calls. This decorator accepts 2 main parameters,
- run_type: The type of the function. It can be a tool call, simple chain or LLM call.
- name: The name of the item which will be shown in trace
So let’s add this decorator to our functions
And now we are ready to trace our agent activity, so let’s try it by running our agent!
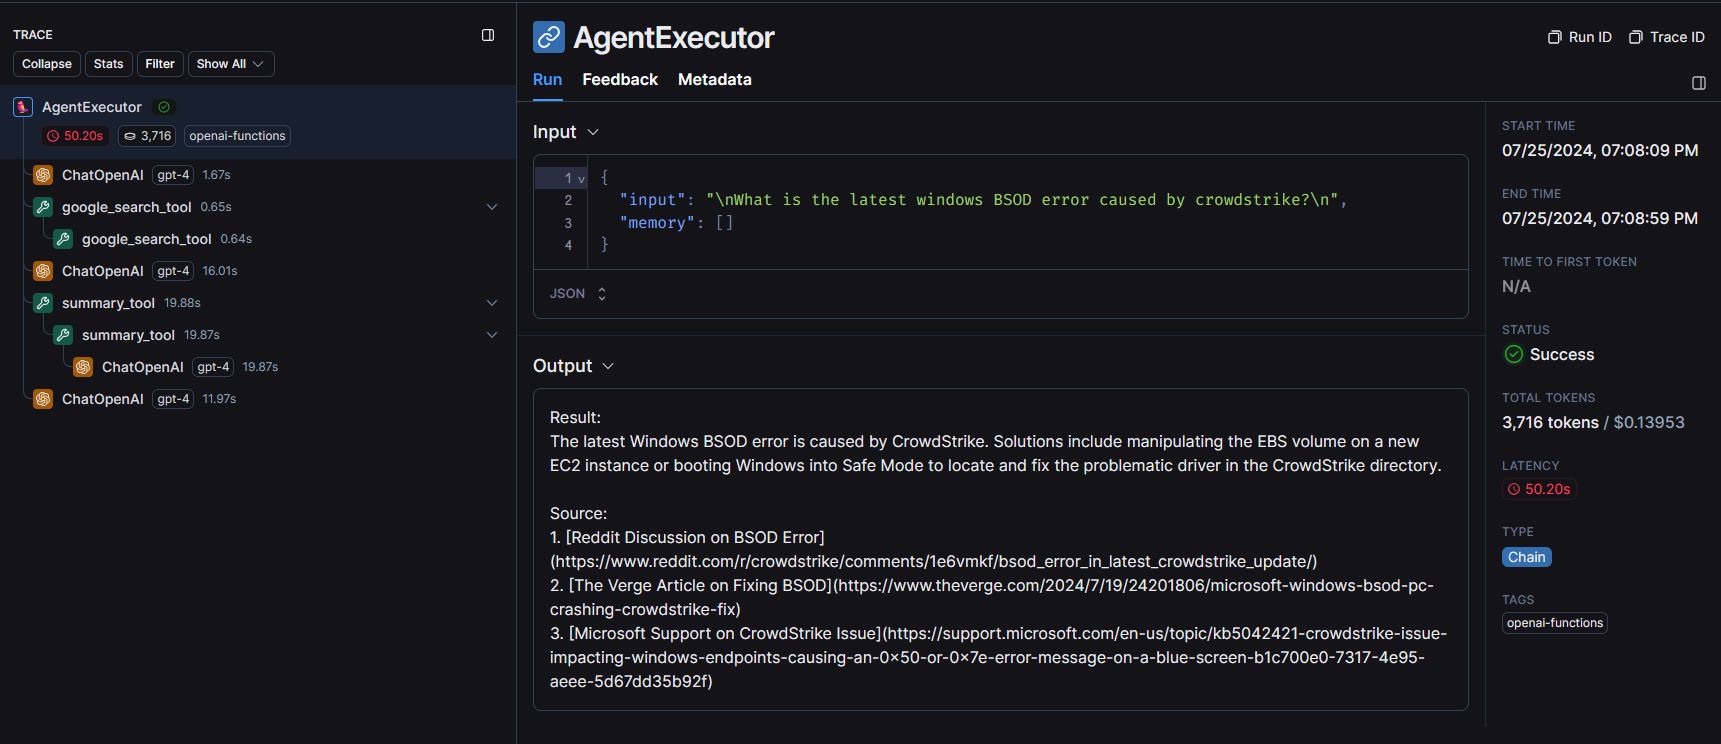
After successfully running the agent, you will be able to see a new entry in your project runs table and after clicking that run you can see the detailed trace of the agent including information like input, output, total tokens and tool calls.
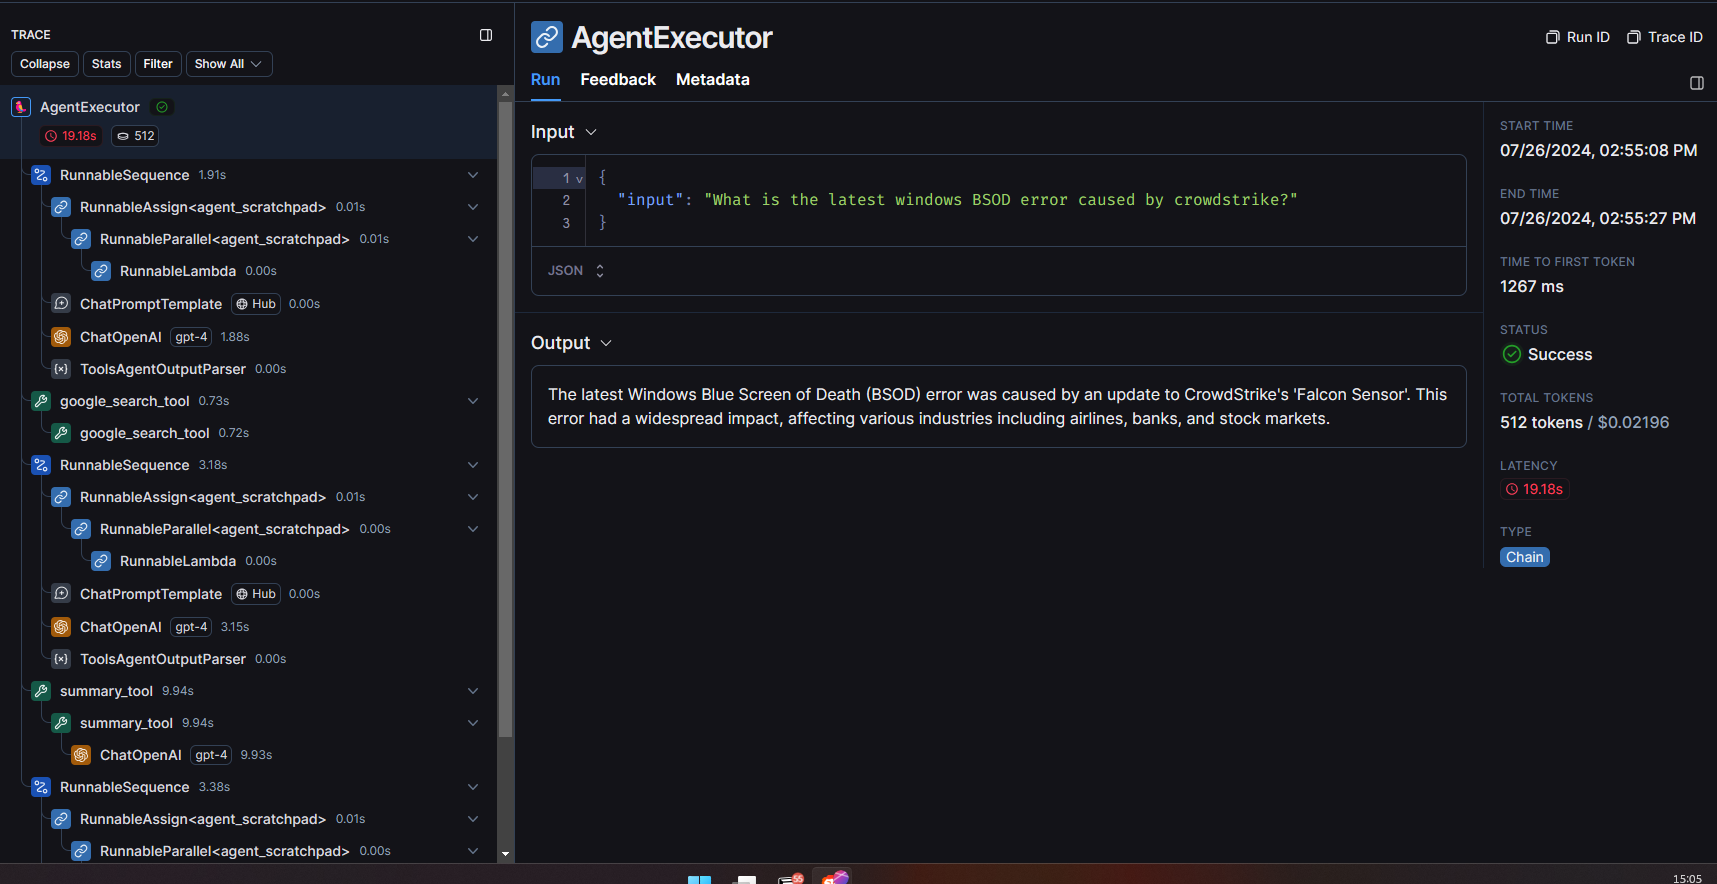
In this example, I invoked the agent with that same windows BSOD news input and as we can see in the below image it first made an LLM call to decide which tool to use and then it called the google search tool and then after again it asked LLM to decide the next steps and then used summary tool to summarize the results.
Tracing Every Single Agent Step
If we want to know how exactly our agent works under the hood and how it does the function calling then we can also do it using LangSmith. We just need to invoke our agent a bit differently so let’s take a look at it!
First we will need to import some dependencies
To manually run the agent, we will need to pass the custom prompt for function calling and you can get such prompts from Huggingface. We will use langhub to access huggingface and we will create one tool-calling agent using “create_tool_calling_agent” method and then we will invoke that agent using “AgentExecutor”.
After running this agent, you will see one more entry in your LangSmith runs table but this time you will be able to see more information than before which allows you to monitor every single step taken by our agent to get the final result.
Evaluation
Now it’s time to evaluate our agent. Agent evaluation using LangSmith is very similar to evaluating an LLM model using a dataset. We will follow the same procedure here as well to evaluate our agent using a dataset and our evaluation function to check if the agent performed well or not so let’s get started!
In this section, we will evaluate our agent for the 3 main aspects:
- Agent Step Evaluation
- Agent Response Evaluation
- LLM Evaluation
So let’s get started 🚀!
Agent Step Evaluation
To make your agent production ready and to automate any workflow without any problem, you need to ensure that it follows a fixed structured path because LLMs can be random sometimes and it can take different path and make different tool call which can cause errors. To evaluate this quality of an agent it is necessary to evaluate the tool calling capability of your agent.
This is where agent step evaluation comes in, In this evaluation we will create a dataset of input and expected tool name and compare it with the steps agent is taking. So let’s start it by creating our dataset 📁!
There are 2 main ways to create a dataset in LangSmith
- Create a dataset using code
- Create a dataset from your existing runs
We will discuss these both ways in this blog. For agent step evaluation, we will create the dataset using code so let’s create one!
The above code first initializes a LangSmith client and then checks if the user doesn’t have a dataset with that name then it will convert the examples in input and output format and add it to the dataset. You are free to add your own examples in this dataset and play around it.
After running the above code, you will see your dataset examples in the datasets section.

Now we have our dataset ready so let’s create evaluation functions. Now the first question which might come in your mind is that “How do i get the name of tool which is being called? 🤔” because generally we only get the final response. So there is a method called “bind_tools” which allows you to get the next tool name along with the output so let’s implement it.
Now we just need to invoke this assistant using the invoke method and it will give us the response.
To evaluate any agent, we will need 2 functions,
- Function to get the assistant response
- Function to evaluate the assistant response
In the assistant response function, we will just invoke the assistant and return the result and in evaluate method we will get the expected function call from the dataset and compare it with the agent response and if it matches then we will give it a score of 1 otherwise we will score it 0.
Finally run the evaluation!
After running the above code, you will see a new entry in experiments tab of your dataset.
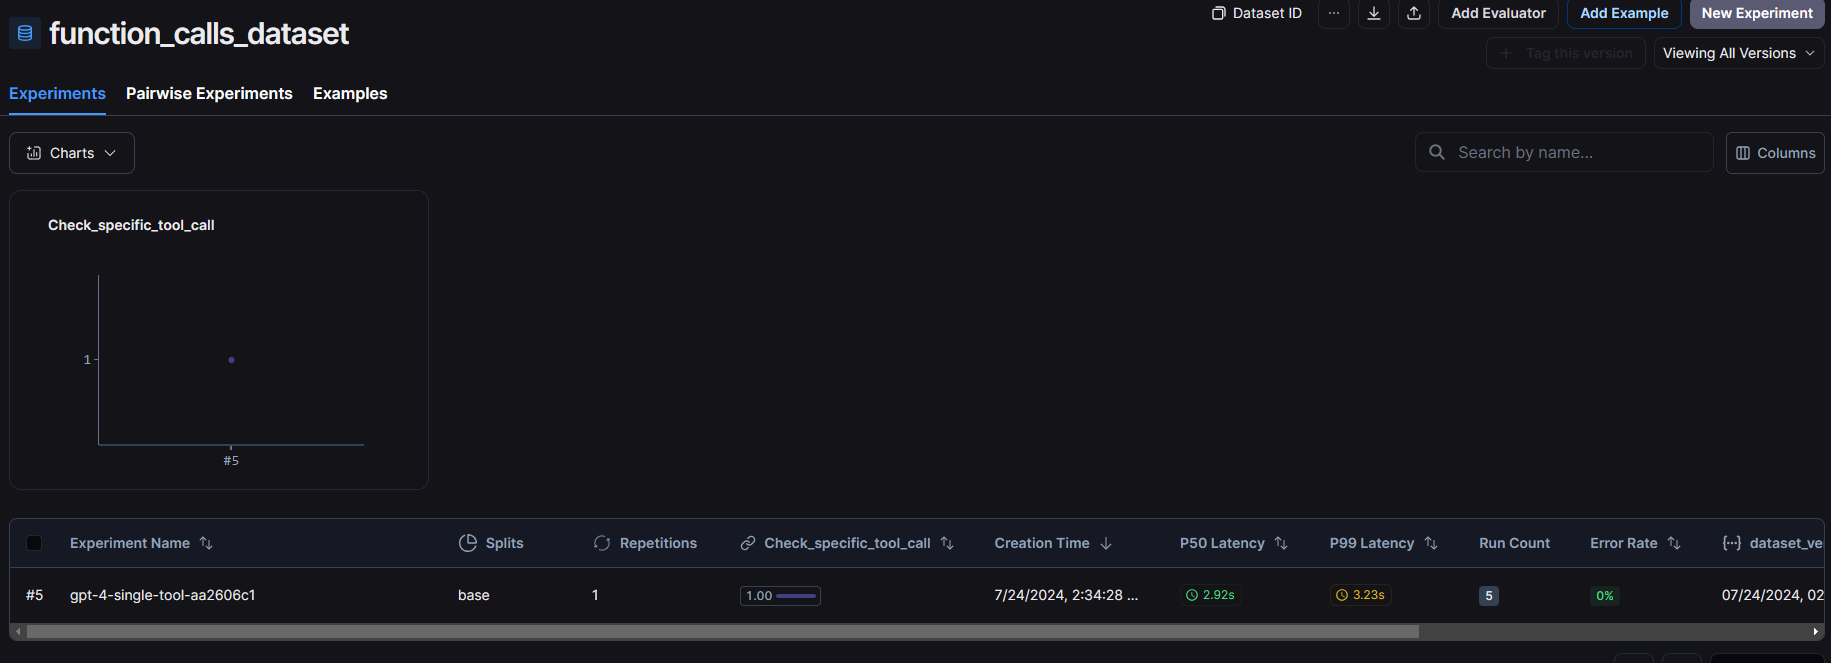
You can see the score, latency and other information in this row. Click on it to see more information about the evaluation.
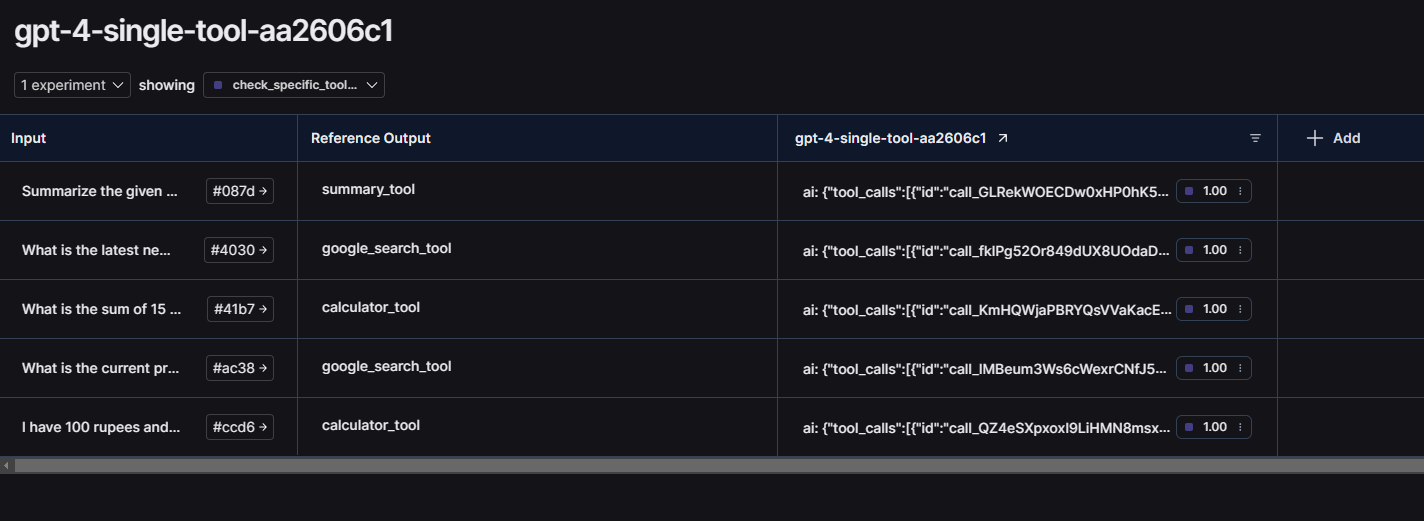
As we can see, our agent passed this evaluation with the score of 1! You can also click on individual evaluation item to trace the agent activity for that input.
Agent Response Evaluation
Now let’s evaluate the agent response. Here we will have a dataset of input and expected output and we will compare it with agent’s final response.
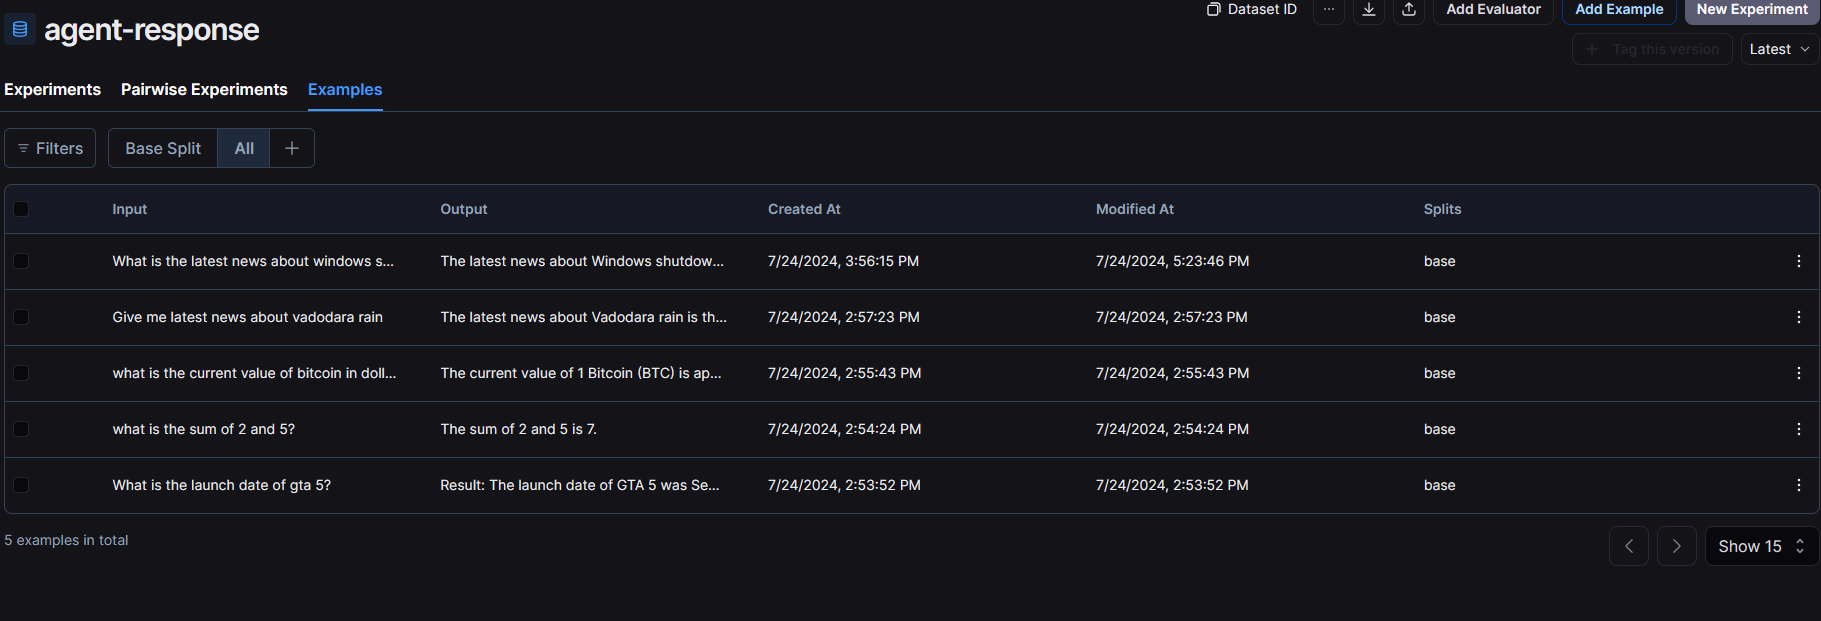
This time we will create the database from the agent’s previous runs but you can create it using code by following the same way we discussed above. In the LangSmith dashboard, after opening any run you will see a button called “add to dataset” which will allow you to add the input and output of that run into your dataset.
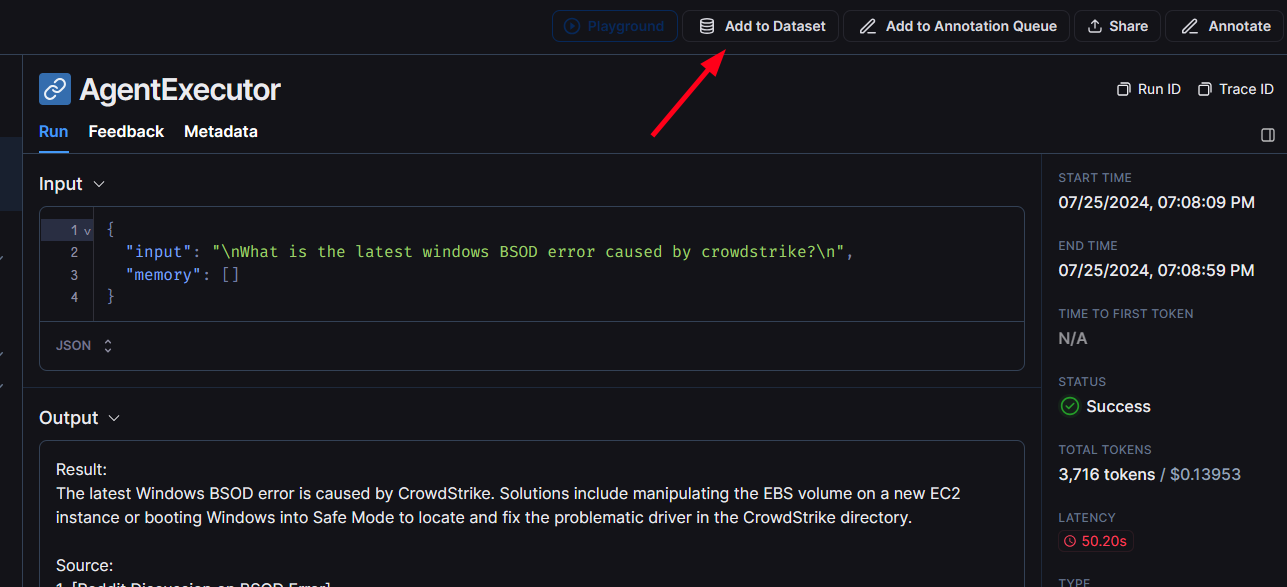
After clicking that button, you can edit the input and output and add it in dataset. if you don’t have any dataset created then create one.
I ran my agent 5 times with different examples and added all the responses in my dataset. Here is how it looks like:
Now we are ready to evaluate our agent so let’s get started!
First create the evaluator and response function. In the evaluator function, i am using gpt-4 to evaluate the agent response based on the given input, expected output and agent output and it will return the similarity score between 0 and 1.
It is a good practice to use different LLMs to evaluate your agent.
And finally let’s evaluate this agent 🤖!
After running the evaluation, you can see the results in the experiments tab of your dataset.
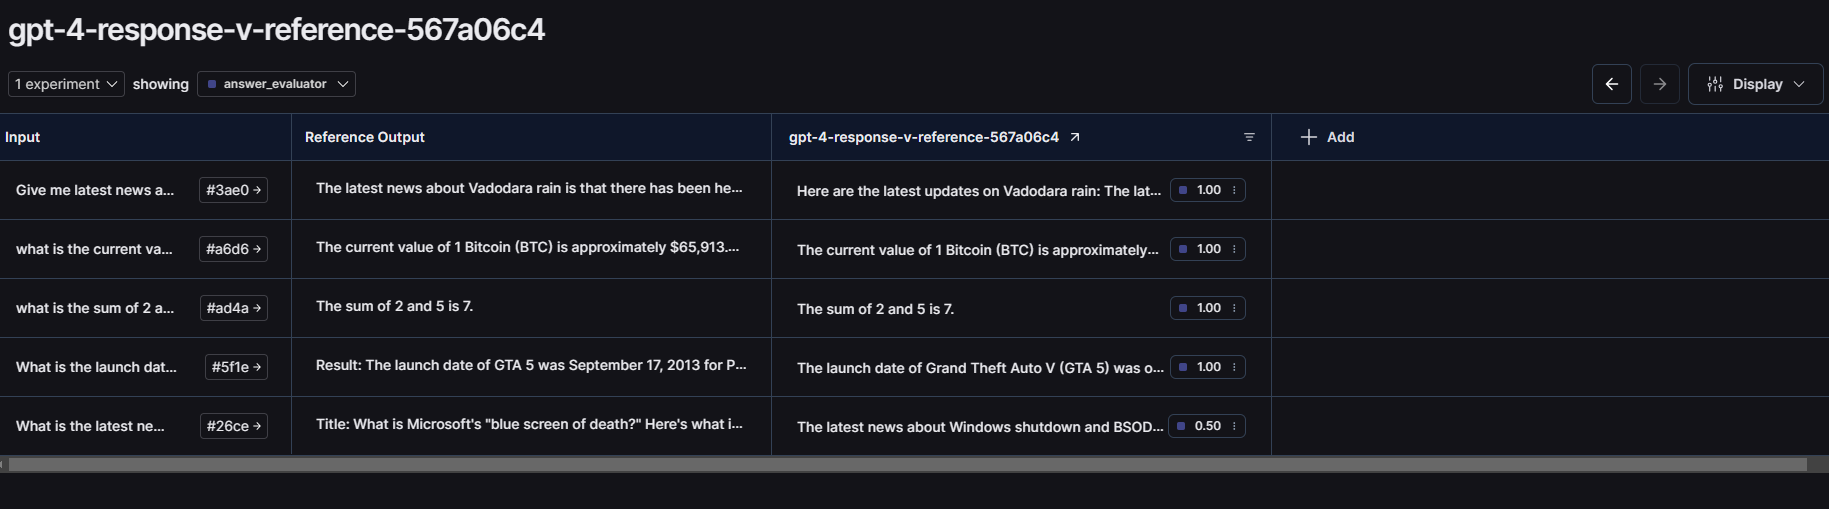
As we can see, our agent successfully passed the test 🎉!
You can add more complex examples to test this agent for production but for the sake of the blog i have added very basic examples.
LLM Evaluation
We all know that all AI agents uses large language models (LLMs) under the hood so it becomes essential to test your LLMs function calling capabilities to choose the right model for your agent. The above 2 methods are used to evaluate your function implementation and your agent workflow.
In this section, we will test 4 most popular LLMs for our agent and see how every LLM performs.
GPT-4
We already have evaluated gpt-4 model in the agent response section so i am just going to add the evaluation results for gpt-4 model.
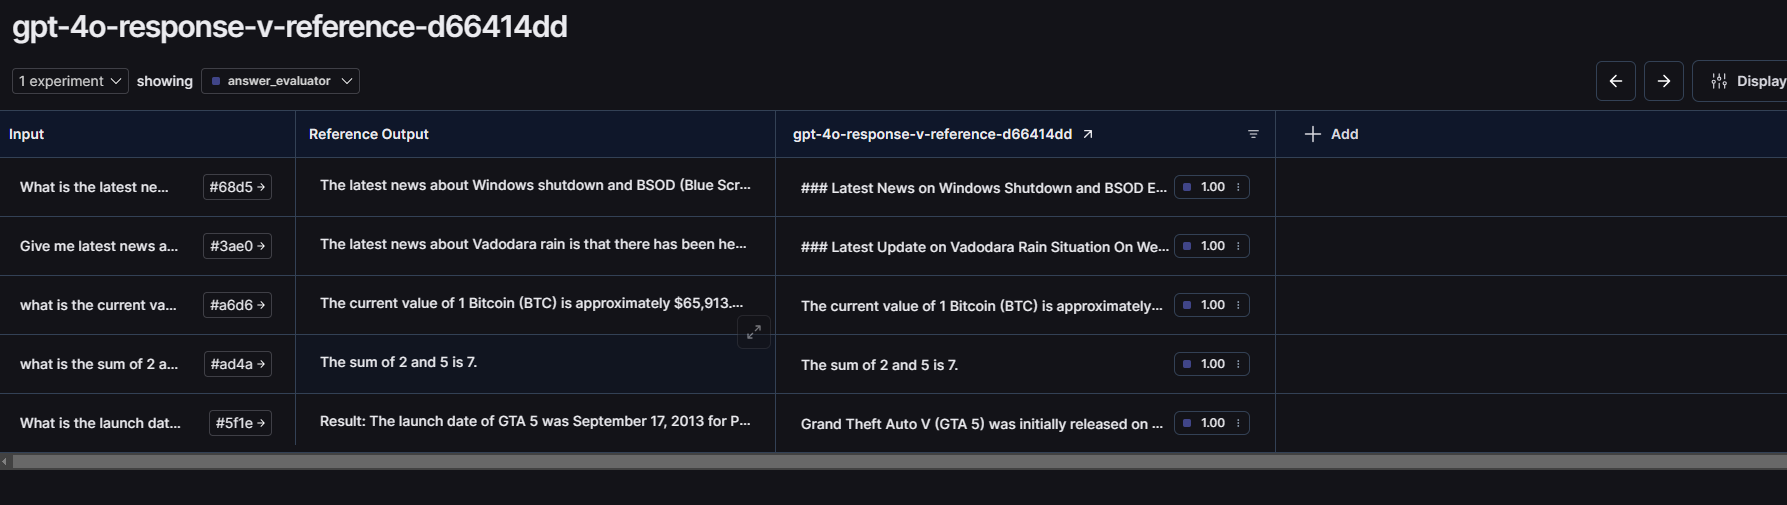
GPT-4o
Let’s test our agent for latest gpt-4 omni model. We just need to change to model name in our openai wrapper and it will work.
The evaluation functions will stay the same you just need to change the experiment prefix and metadata to differentiate between different model evaluations.
Here are the evaluation results for gpt-4 Omni
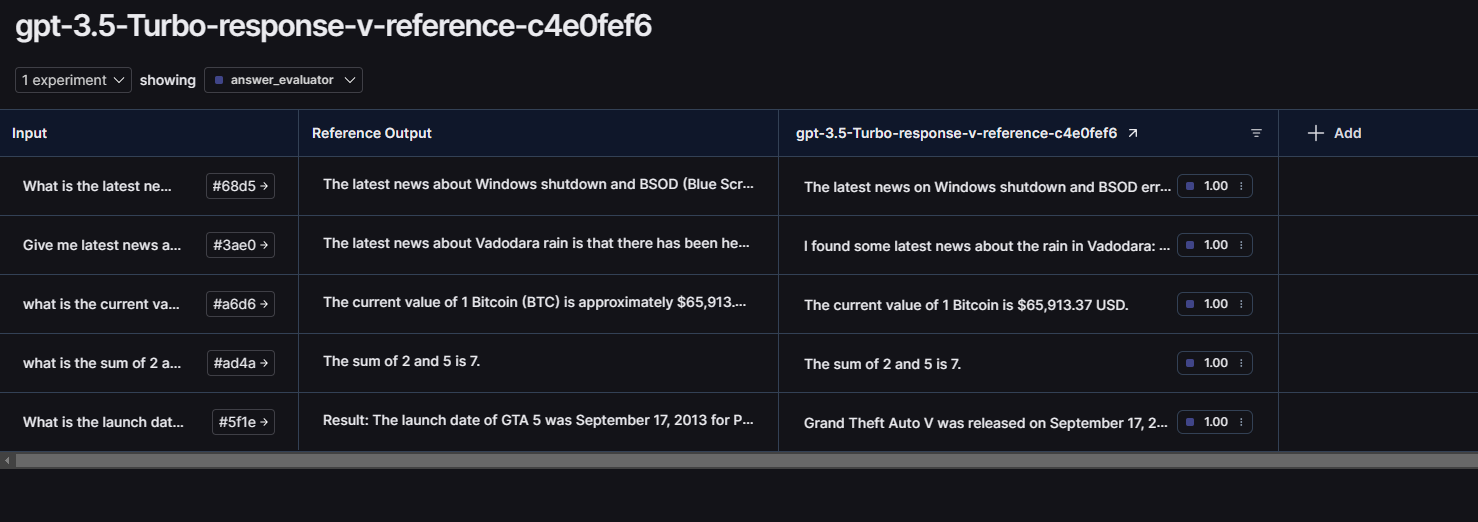
GPT 3.5 Turbo
Let’s test the function calling capabilities of gpt 3.5 turbo model. This is very basic agent and the dataset examples are also basic so it should also pass all the tests.
Run the evaluation
Here are the results!
Now let’s compare these 3 GPT models side by side. To do this, click on “+Add” button on the next column of your evaluation results table and select any other evaluation for this same dataset.
Here is the side by side comparison between GPT-4, GPT-4 omni and GPT-3.5 Turbo
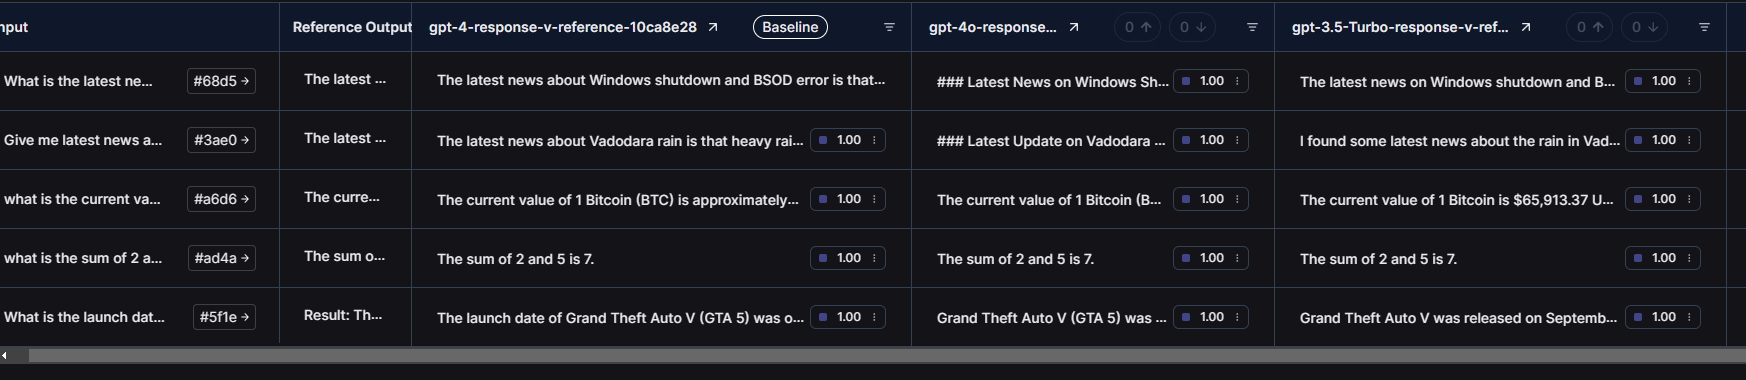
As we can see, every model was able to pass these basic tests but if you take a look at the latency then surprisingly GPT-3.5 Turbo was faster than the other 2 models. It can be the case because the agent and dataset examples were very basic so GPT 3.5 Turbo can be the best option for basic models.
Llama3
Now let’s test llama3 model with our agent. To use llama3 as an LLM in our model, we first need to configure some things. I am going to use Groq here to access llama3 but you are free to use any other inference providers or you can run it locally using Ollama (If you have a capable pc ofc).
I am going to use ChatGroq from langchain_groq module to access groq models.
The evaluation functions will stay same so you just need to change the experiment prefix and metadata.
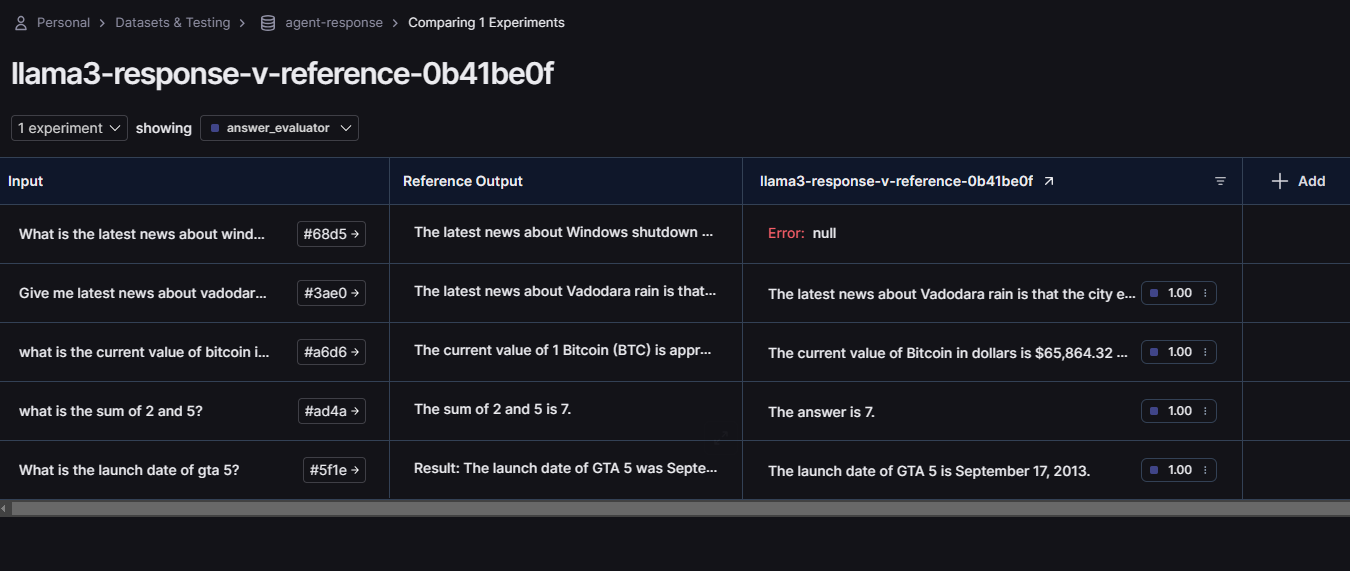
Here are the results after using Llama3 as an LLM for our agent (Ignore that null error because it happened because i hit the rate limit for Groq 💀)
Llama 3.1
Recently meta released a new llama version called Llama3.1 and they are claiming that it is the most capable model till date. Also it is an open source model so it will be so much cheaper than gpt models. But i don’t think it is still properly fine-tuned for function calling 🤔 so we might need to wait for fine-tuned versions of llama3.1 which supports function calling. There might be some instruct models on huggingface and other platforms but currently i am going to use “llama-3.1-70b-versatile” model from Groq.
You just need to change the model name in ChatGroq method and you are good to go!
Let’s evaluate the model!
And here are the results!
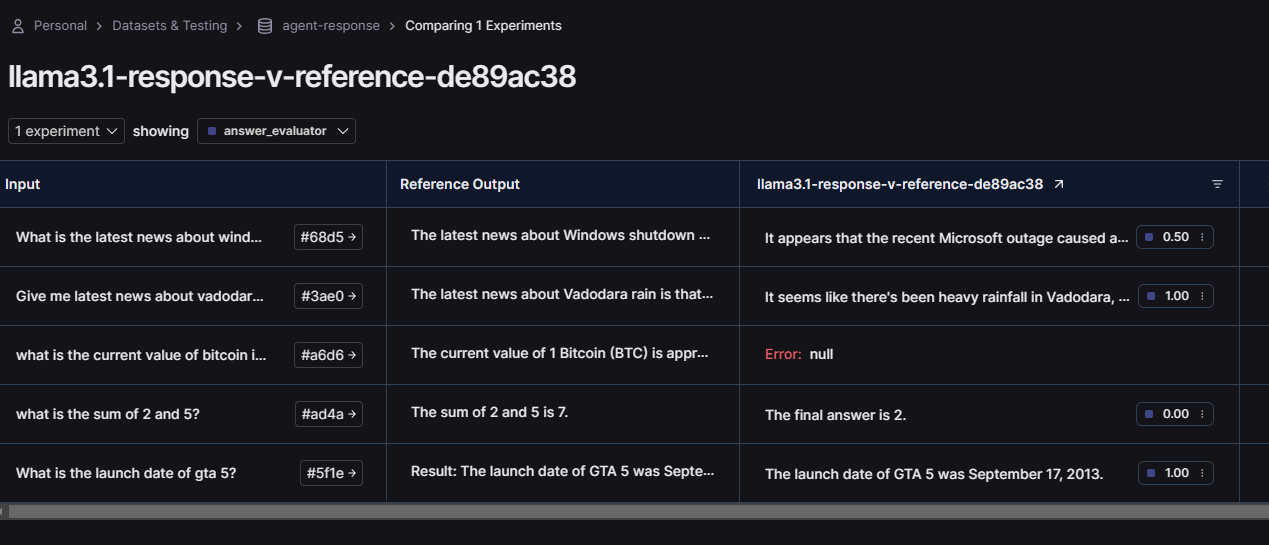
It didn’t perform well because I think the model I was using was not capable or fine-tuned enough for function calling but in future we might see some crazy examples. Let me know if you can find any better or fine-tuned version of llama3.1 which works perfectly.
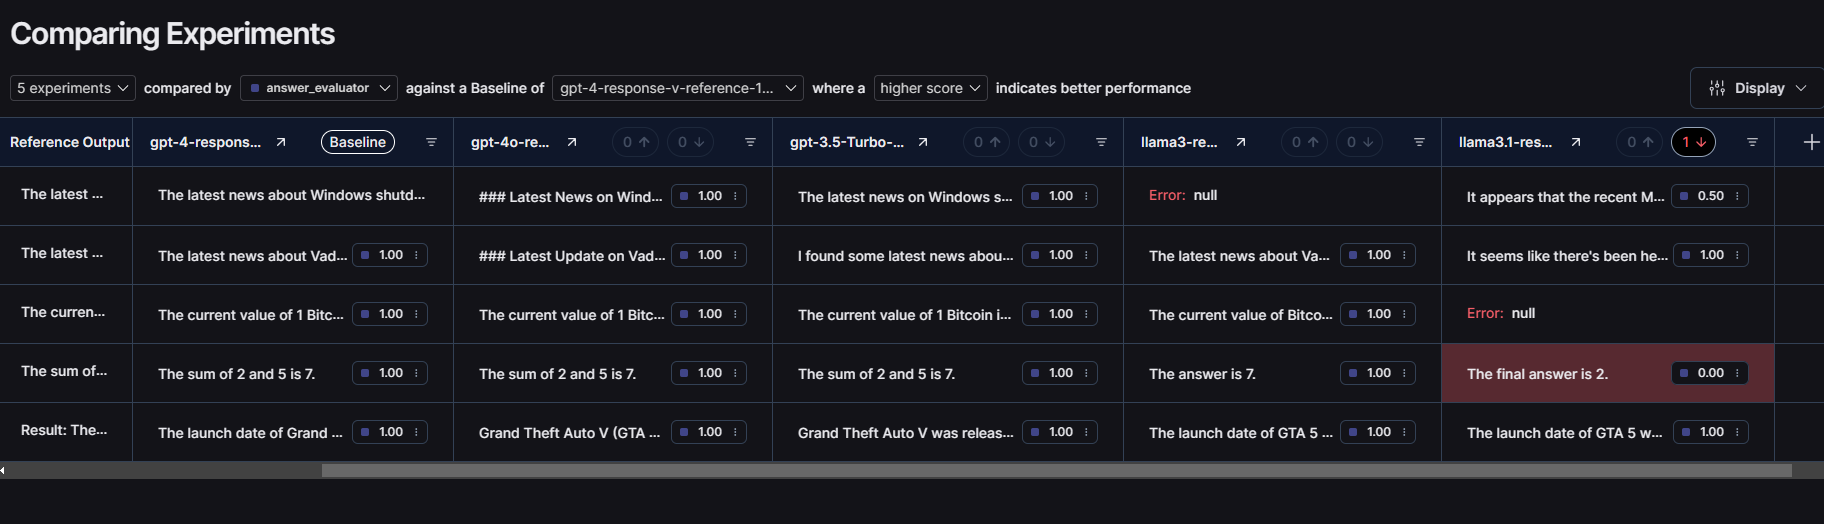
Here is the side by side comparison of every model we evaluated so far 👇
Conclusion
As we saw in the blog, it is a very essential step to evaluate your AI agent performance before putting it into production and you can do it very easily using LangSmith. We also discussed 3 main aspects of agent evaluation which allows us to test the tool implementation, agent workflow and LLM.
Also we compared different large language models to test the function calling capabilities of every model and every model performed well for our agent because it was very simple agent and the examples in the dataset were also simple and limited, But I highly encourage you to test your agent with more complex examples according to your workflow to evaluate your agent in the best possible way so that your agent can perform well in production with minimal latency and errors.
Level up your organization with Ionio
So, whether you are a small team looking for automating your company workflows, an individual wants to automate any task using AI or a bigger organization want to integrate autonomous AI agents in your organization then we at Ionio have experience in building custom AI agents and we will be more than happy to help you.
Since 2021, we have helped many organizations with our AI solutions to automate their workflows whether they are a big organization or a bootstrapped startup. We also have written many blogs to document our processes of creating various AI agents and AI content. If you are looking to build something with AI then kindly book a call with us and we will be happy to convert your ideas into reality to make your life easy.
Thanks for reading 😄.


.png)